Toyota Camry 2007-2011: How to Replace Front Grille
Do you want to give your Toyota Camry a face lift? Nothing will change its looks more than a new grille. Here's how to replace it yourself.
This article applies to the Toyota Camry (2007-2011).
Your Camry is already nice, it provides a comfortable ride while maintaining a clean modern style. However, as with all works of art, perfection lies in the eyes of the person with the paint brush, and as a car enthusiast that person is you. The grille is one of the easiest places to start customizing your vehicle. There are a number of different styles you can use, such as matte or chrome colors. You can also take the opportunity to update the front-end with a later model grille. Whatever design you choose, you can complete the installation yourself just by using the following instructions listed here.

Materials Needed
- 10mm socket
- Philips screwdriver
- Flat head screwdriver
- Trim/clip remover
Step 1 – Remove the lower bumper cover
The bumper assembly needs to be removed. The first part involves removing the lower bumper cover assembly. It is held in place by six 10mm bolts. Loosen and remove them, then remove the lower bumper cover.

Step 2 – Remove the bumper
- Open the hood and remove the two 10mm bolts.
- Remove the two clips supporting the bumper in the wheel wells.
- Remove the Philips screws under the bumper inside each wheel well.
- Pull back the plastic covers from inside the wheel well.
- Remove the bumper assembly from the chassis of the car.
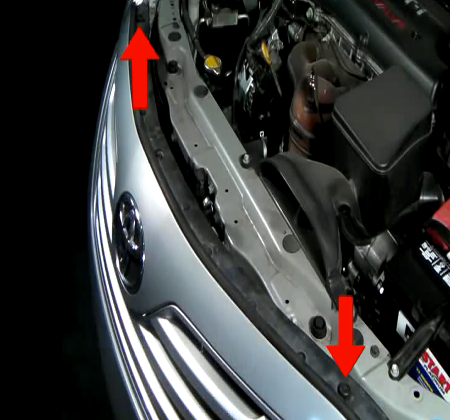
Figure 2. Remove the two bolts from under the hood. 
Figure 3. Remove the trim clips from the bumper cover.
Step 3 – Remove the upper grille
Take the time to tape the edges around the upper and lower sections of the grille. This should help to avoid any accidental scratches you would otherwise incur.
- Loosen the two screws holding the upper grille in place.
- Use a flat head screwdriver to pry off the bottom clips of the grille.
- Remove the grille from the bumper cover.

Figure 4. Loosen the two Philips screws holding the grille in place. 
Figure 5. Pry out the clips holding the lower section of the grille in place. 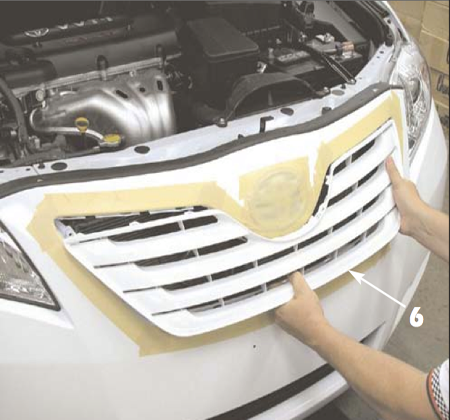
Figure 6. Remove the front grille.
Step 4 – Install the new grille
You can install the grille and be done, or you can paint some of the pieces of hardware from behind the grille and keep them out of plain sight. To paint, tape off the bumper cover around the grille opening and spray some paint onto the mounting hardware.

- Align the grille to its mounting location.
- Clip the grille in place and tighten the two Philips screws.

If you are installing a lower grille, proceed to Step 5. If not skip to Step 6.
Step 5 – Install the lower grille
The bottom grille will have some extended silicone mounting to points that can be cut to fit. Just as you did for the upper grille, apply some masking tape to the lower portion.
- Align the lower grille and fit it to the bottom of the bumper.
- Cut the silicone mounting point to fit.

- Mount the bottom grille.
- Attach a black washer on top of each mounting point.
- Install half nuts on each of the mounting locations and tighten.

Step 6 – Install the bumper cover
- Mount the bumper cover back onto the car.
- Tighten the 10mm bolts from the top of the engine bay.
- Connect the clips from around the bumper cover.
- Install the lower bumper cover.
- Remove the masking tape and you are done.

How to Replace Front Grille
Related Discussions and Site
- How to Replace 2011 Camry Front Grille - Camryforums.com
- Default Toyota Camry 2010 Replace Front Bumper Grille - Front, Lower - Camryforums.com
- Grille Installation Instructions - Carid.com